A leaky faucet may seem like a minor issue, but it can waste thousands of gallons of water. And, if you are living on Long Island, for instance, high water bills will increase your monthly expenses. In other words, whether you are dealing with a slow drip or a constant stream, learning how to fix a leaky faucet can save your money on water bills and prevent further plumbing damages.
This guide covers the common causes of faucet leaks, the tools needed to repair leaks at home, and an easy DIY faucet repair process to fix leaks without calling a plumber.
Common Causes of Faucet Leaks
There can be various reasons that your faucet leaks constantly. However, the following are more common reasons for causing a leak in the faucet.
1. Hard Water Buildup
You might already know Long Island’s hard water can wear down faucet parts over time. These can be due to high mineral deposits inside faucets.
2. Worn-out Washers
Washers press against the valve seat every time you turn off the faucet. Overtime, friction can wear them down, leading to leaks and drips.
3. Loose or Damaged O-rings
O-rings help seal the faucet’s moving parts like handles. If the leak is coming from the base of the handle, it is due to loosen or cracked O-rings.
4. Corroded Valve Seat
If you notice leaks near the spout, a corroded valve seat may be the issue. This is especially common in homes that rely on well water in Eastern Long Island.
Tools Needed for Faucet Repair
Before starting the DIY faucet repair, gather the following tools. If not available at home, you can gather them at Huntington Plumbing Supply or Green Art Plumbing Supply.
- Adjustable wrench
- Phillips & flathead screwdriver
- Replacement Washers & O-rings
- Plumber’s tape
- Bucket (to catch any excess water)
- White vinegar (for cleaning any mineral deposits)
Step-by-Step Guide to Fix a Leaky Faucet
Here is an easy DIY guide to fix your leaky faucet whether in the kitchen or a bathroom.
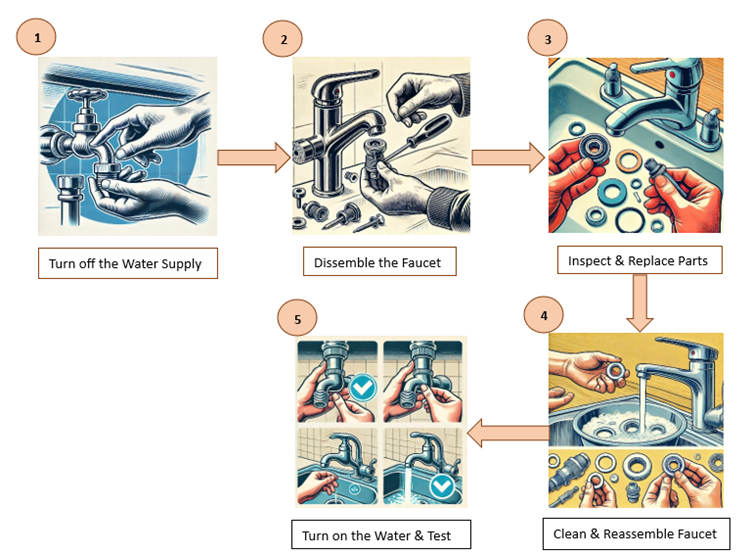
Step-01: Turn off the Water Supply
- Locate the water shut-off valves under your sink. Turn them clockwise to stop the water flow.
- Alternatively, if you cannot locate it, turn off the main water supply.
Step-02: Dissemble the Faucet
- Use a screwdriver to take off the screw securing handle and remove the handle.
- Also, depending on your faucet type, you may need to unscrew additional components to reach the worn-out washer, O-ring, and cartridge.
Step-03: Inspect & Replace Faulty Parts
- Replace the washer for compression faucet.
- Remove and install a new cartridge if you have the cartridge faucet.
- Replace damaged O-Rings or seals for disk faucets.
Step-04: Clean & Reassemble the Faucet
- Soak parts in white vinegar to remove hard water deposits.
- After that, apply plumber’s tape around threads to prevent future leaks.
- Lastly, reassemble the faucet and tighten the screws.
Step-05: Turn on the Water & Test
- Turn on the water supply slowly.
- In addition, let the faucet run for a few seconds to check for leaks.
If the leak is gone, Congratulations! You have completed the DIY Faucet Repair.
For more DIY plumbing fixes:
10 Common Plumbing Issues and How to Fix Them Before Calling a Plumber
Top 5 Plumbing Issues in New York Homes and How to Fix Them
Preventing Future Faucet Leaks
Above all, to prevent leaks in Long Island’s hard water conditions, below are some additional tips. By following these, you can avoid constant leakages.
- Clean your faucet monthly to remove mineral buildup.
- Check faucets and O-rings every 6-12 months.
- Avoid overtightening the faucet handle.
- Use a water softener, for instance, if you have well water.
Need Professional Help?
If your faucet continues to leak despite replacing washers and O-rings, it may be a time to call for some professional help. At paradise plumbing, we deliver exceptional plumbing solutions across Long Island, NY. Contact us now and book your meeting!
In conclusion, fixing a leaky faucet in Long Island is a simple DIY project that can help reduce water bills and prevent hard water damage to your plumbing. By understanding the common causes of faucet leaks and using the right tools for faucet repair, you can complete this task in under an hour.